Git
- https://product.hubspot.com/blog/git-and-github-tutorial-for-beginners
- https://docs.gitlab.com/ee/gitlab-basics/start-using-git.html
Initialize
- Launch Git Bash
- Navigate to project directory
- initialize git repository in the folder root:
git init - create new file in directory:
touch filename.extension - list files in root:
ls - check which files git recognizes:
git status
Staging
A commit is a record of what files you have changed since the last time you made a commit. Essentially, you make changes to your repo (for example, adding a file or modifying one) and then tell git to put those files into a commit. Commits make up the essence of your project and allow you to go back to the state of a project at any point.
So, how do you tell git which files to put into a commit? This is where the staging environment or index come in. When you make changes to your repo, git notices that a file has changed but won’t do anything with it (like adding it in a commit).
To add a file to a commit, you first need to add it to the staging environment. To do this, you can use the git add <filename> command.
Once you’ve used the git add command to add all the files you want to the staging environment, you can then tell git to package them into a commit using the git commit command. Note: The staging environment, also called ‘staging’, is the new preferred term for this, but you can also see it referred to as the ‘index’.
- Add files to the staging environment:
git add filename.extension - Check staging environment for new files:
git status
Commit Locally
git commit -m "Your message about the commit"
Branches
Say you want to make a new feature but are worried about making changes to the main project while developing the feature. This is where git branches come in.
Branches allow you to move back and forth between ‘states’ of a project. For instance, if you want to add a new page to your website you can create a new branch just for that page without affecting the main part of the project. Once you’re done with the page, you can merge your changes from your branch into the master branch. When you create a new branch, Git keeps track of which commit your branch ‘branched’ off of, so it knows the history behind all the files.
git checkout -b <my branch name>- Show list of branches:
git branch
Commit to Github
- Create new repo on GitHub
git remote add origin <url produced on github for new repo>git push -u origin [master/main]
Push a Branch to Github
git push origin <my-new-branch>
You might be wondering what that “origin” word means in the command above. What happens is that when you clone a remote repository to your local machine, git creates an alias for you. In nearly all cases this alias is called “origin.” It’s essentially shorthand for the remote repository’s URL. So, to push your changes to the remote repository, you could’ve used either the command: git push git@github.com:git/git.git yourbranchname or git push origin yourbranchname
Pull Request
A pull request (or PR) is a way to alert a repo’s owners that you want to make some changes to their code. It allows them to review the code and make sure it looks good before putting your changes on the master branch.
Get Changes on Github
git pull origin master
check all new commits: git log
View Differences
- run:
git diff
Remove a Branch
Locally
git branch -d <branch_name>
Remote
git push <remote_name> --delete <branch_name>
Remove tracked file/directory
File
git rm --cached <file>
Directory
git rm --cached -r dir/
pre-commit
Please make sure to install our pre-commit hooks into your Git workflow. Pre-commit will help keep our code clean and make sure we are following best practices.
- Install pre-commit hooks:
python -m pre_commit install --install-hooks - Run hooks on the entire codebase:
python -m pre_commit run --all-files
Hooks will run on the current commit snapshot when executing a git commit. Pre-commit hooks allow us to check for potential issues and make sure we are applying standards to our code before pushing to GitHub.
See an example .pre-commit-config.yml
Merge
The steps below can be used to merge two branches on your local machine. The braches used in this example are:
main: The authoritative or “production” code lives in this branch.dev: This branch is split from themainbranch and a new feature or update is coded with the intent to merge changes back into themainbranch.
Pull
mainanddevbranches so local repo is up to date with the remote.git checkout maingit pull origin maingit checkout devgit pull origin dev
Checkout the main branch so we can merge the
devbranch intomaingit checkout maingit merge dev

git-merge Check the branch status:
git status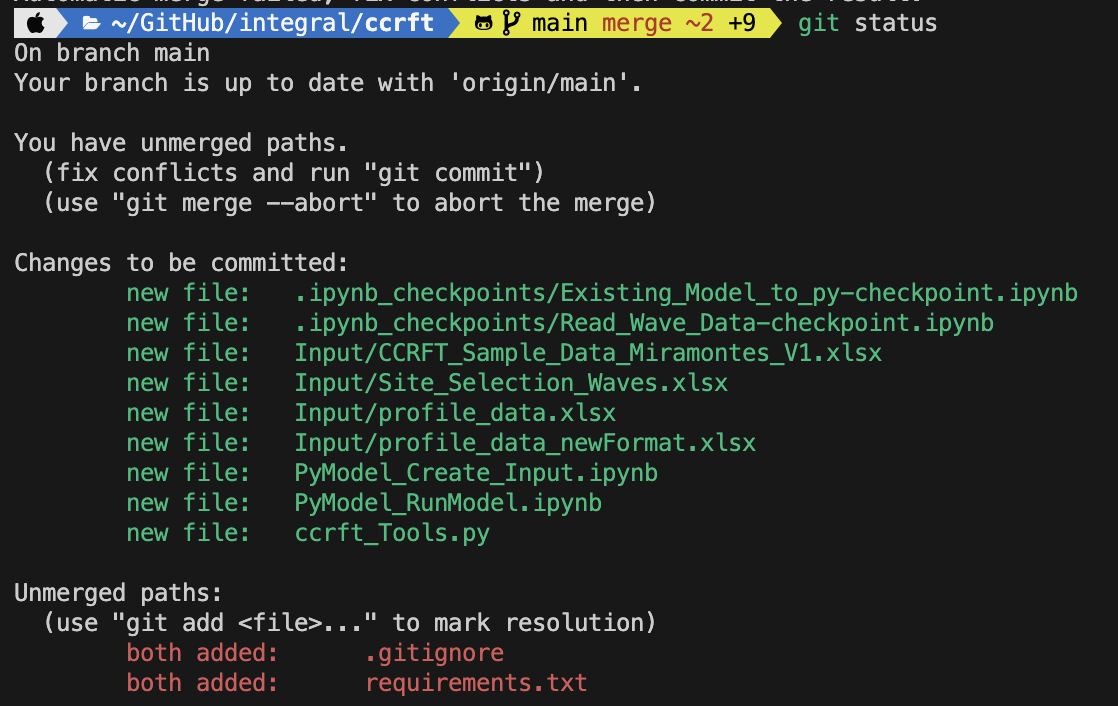
git-status Evaluate the two files with a conflict (ie.
.gitignoreandrequirements.txt) and reconcile issues, thengit addwhen ready.Commit the changes:
git commit -m "merge @tnelson-integral dev branch with main"Push changes to the remote on GitHub:
git push origin mainCheck out the
devbranch locally and pull themainbranch changes into it sodevcan be up-to-date withmaingit checkout devgit pull origin maingit push origin dev